
It does not take much to turn your site into a simple online store. Much less than setting up an eCommerce plugin or installing an online store theme, if all you have are a few items for sale online, a paypal button may be the way to go. After all, they are simple, straightforward, and secure.
Adding a PayPal button to your website can be done in just a few steps. Get prepared, though, because you will have to deal with some code. Just a little bit though. If you haven’t already created a PayPal account, you’ll want to do that first. Here are the steps to adding the button, then after I’ll share some pros and cons to having a PayPal button on your site.
 How to Add a PayPal Button

- Make sure you’re logged in to your WordPress and PayPal accounts. In PayPal, click on the Merchant Services tab…
- …then click “create your payment buttons”.
- Select an option to build your button. Odds are if you’re reading this post as a guide, Option 1 is right for you. If you were using an eCommerce plugin, Option 2 would be the appropriate selection. For now, go ahead and click the blue “Create a Button”.
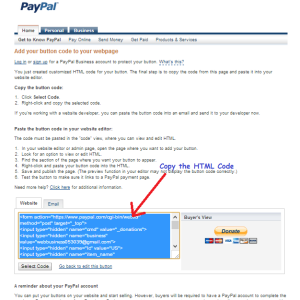
- Fill out the 3 steps to creating the button. At the end you’ll find the code that generates the button, which is shown as a preview on the right side. This is the code you’ll copy and paste into the text editor (the WYSIWYG editor) on the page you’re editing in WordPress.
- On your WordPress edit page, in the top right corner of the WYSIWYG editor are two buttons: “Visual” and “Text”. Click over to Text mode, paste in the code, and you’re good to go. Click the blue Publish/Update button to save the page.
At this point you may wish to edit the rest of the content on the page. If you click back over to visual mode, you’ll see a gray box that represents where the button code sits in your page content (users with WordPress versions 3.9 and older will see a yellow box). This is WordPress’ way of telling you that something dynamic (like a video or flash) is happening there. If you delete that yellow box, you also delete the code for the button. So don’t. You can still write content, add pictures, etc… around the box without any troubles. Remember to always save any updates you make, of course.
A Simple, Secure Way to Do Business
As I mentioned, these buttons are a fast, simple and secure way to get started selling your product online. And it’s free!… minus the fees PayPal takes out per transaction. On top of that, people recognize PayPal as a trusted way of doing business online (they even say so on their website).
Probably, the most beneficial reason for using PayPal – or any merchant service for that matter – is because the heavy lifting is done for you. Jarring issues like encrypting credit cards and PCI compliance can be monstrous beasts to tame. They costs lots to maintain, and could cost you your entire business if you were to lose all that data. Remember what happened to Target a few months ago?
There are other ways of doing selling online that further increase your credibility and enhance your brand. You can achieve this through integrated plugins like Cart66 and Stripe with your PayPal account. These are white label, allowing you to brand yourself better, and still handling security and storage for you. Really there’s an endless supply of solutions out there. It’s up to you to find what’s a good fit for your process.